All examples
Tone mapping and exposure
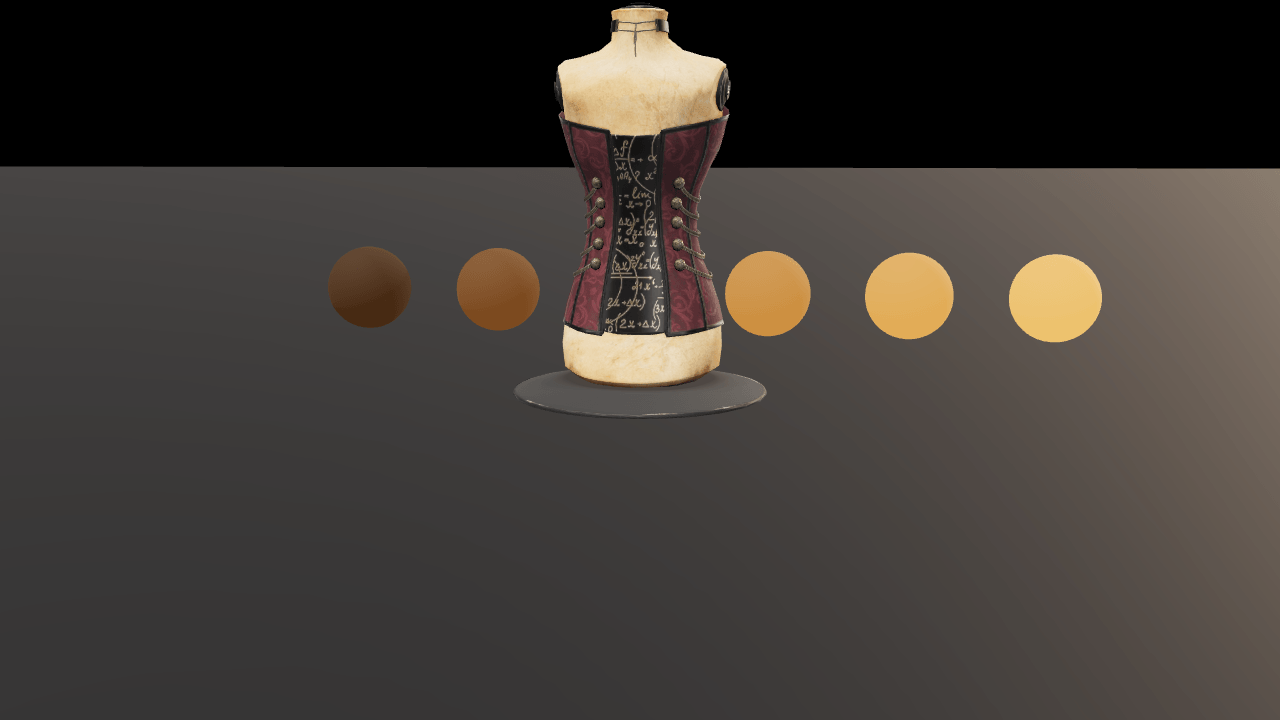
Tone mapping turns a scene’s wide range of brightness into colours a screen can display. Compare Standard, ACES and Neutral curves, or turn tone mapping off. The glowing spheres make differences in highlights easy to see.
Off airLivePaused
Tone mapping and exposure
Lighting · 3D
WebGPU: checking…See browser support
Try this
- Raise Exposure to three and turn on the comparison to inspect the bright spheres.
- Set the comparison to Neutral and flip: it keeps more of the amber than ACES does.
- Lower Exposure to 0.5 and compare the curves again.
Show source code
Source
import { Camera, Environment, ENVIRONMENT_ASSET_TYPE, MODEL_ASSET_TYPE, Model } from "ignifx";import { bootExample } from "../_kit/boot.ts";import { twoPlaces } from "../_kit/format.ts";import { attachOrbit } from "../_kit/orbit.ts";import { bind, readout, select, slider, toggle } from "../_kit/panel.ts";import { createLightRig, createStudioFloor } from "../_kit/stage.ts";import { COMPARE_CURVE, createEmissiveRamp, CURVES, FOCUS, GRADING, KEY_INTENSITY, SHOT, START_CURVE, SUBJECT,} from "./scene.ts";import type { AssetHandle, EnvironmentAsset, ModelAsset } from "ignifx";/** * Tone mapping is the last step of a frame: it squeezes a scene whose brightness runs far past one * into the zero-to-one a screen can show. In ignifx it is `Environment.imageProcessing`, one record * on the world's `Environment`: an `exposure` that multiplies the scene first, a `contrast`, and the * `toneMapping` curve. * * The two kinds of change cost different amounts. Exposure and contrast are uniforms, so a slider * can drag them every frame. The curve is compiled into every PBR material's shader, so choosing a * new one rebuilds pipelines — cheap once, not something to animate. Grading is scene-wide and the * world renders through one camera, so the comparison is a toggle that flips between two curves * rather than a split screen. */bootExample({ title: "Tone mapping and exposure", settings: { rendering: { clearColor: { r: 0.02, g: 0.024, b: 0.032, a: 1 } }, }, async setup({ app, panel }) { const eye = app.world.createEntity("Main Camera"); eye.addComponent(Camera, { near: 0.02, far: 200, fov: SHOT.fov }); attachOrbit(app, eye, { yaw: SHOT.yaw, pitch: SHOT.pitch, distance: SHOT.distance, target: FOCUS, minDistance: 1.2, maxDistance: 12, }); // Both loads are awaited before the loop runs, so neither needs a frame pumped to settle. The // `.env` also pulls the BRDF table Lite requires, from the `rendering.brdfLut` default address. const model: AssetHandle<ModelAsset> = app.assets.load(SUBJECT.address, { type: MODEL_ASSET_TYPE }); const environment: AssetHandle<EnvironmentAsset> = app.assets.load("environments/studio.environment.json", { type: ENVIRONMENT_ASSET_TYPE, }); await Promise.all([model.promise, environment.promise]); const sky = app.world.createEntity("Environment").addComponent(Environment, { environment }); sky.imageProcessing.exposure = GRADING.exposure; sky.imageProcessing.contrast = GRADING.contrast; sky.imageProcessing.toneMapping = CURVES[START_CURVE] ?? "aces"; const floor = createStudioFloor(app, { fade: true }); // No shadow, and no `features.shadows` above with it: `shadows` is the example that is about // shadow maps, and a cast shadow here would only be one more thing the curve is not doing. const rig = createLightRig(app, { focus: FOCUS, shadows: false, keyIntensity: KEY_INTENSITY, keyPosition: { x: -1.1, y: 4.2, z: -1.6 }, rimIntensity: 2.4, }); // The rim shines towards the camera and would lay a broad sheen across the floor; the fill would // lift it to grey. Both are for the corset, so the floor is left to the key and the probe. rig.rim.exclude = [floor.entity]; rig.fill.exclude = [floor.entity]; const subject = app.world.createEntity("Corset"); subject.transform.localPosition.set(SUBJECT.x, SUBJECT.height, 0); subject.transform.localScale.set(SUBJECT.scale, SUBJECT.scale, SUBJECT.scale); subject.addComponent(Model, { model, castShadows: false, receiveShadows: false }); createEmissiveRamp(app); // The A/B: two labels, and a flag saying which one the scene is compiled with right now. let curveA = START_CURVE; let curveB = COMPARE_CURVE; let isShowingB = false; /** Applies whichever of the two curves is selected. One assignment; a pipeline rebuild follows. */ const apply = (): void => { sky.imageProcessing.toneMapping = CURVES[isShowingB ? curveB : curveA] ?? "none"; }; panel({ title: "Tone mapping and exposure", groups: [ { label: "Curve", controls: [ select("Tone mapping", Object.keys(CURVES), { value: START_CURVE, change: (label: string): void => { curveA = label; isShowingB = false; apply(); }, }), select("Compare with", Object.keys(CURVES), { value: COMPARE_CURVE, change: (label: string): void => { curveB = label; isShowingB = true; apply(); }, }), // Both selects also move the flag, so the toggle reads it back rather than keeping its own. toggle("Show the comparison", { value: false, change: (on: boolean): void => { isShowingB = on; apply(); }, read: (): boolean => isShowingB, }), ], }, { label: "Grading", controls: [ // Exposure multiplies the scene *before* the curve, so it is what decides how much of // the frame the curve has to deal with. Push it up and the ramp clips from the left. slider( "Exposure", { min: 0.2, max: 4, step: 0.05, format: twoPlaces }, bind(sky.imageProcessing, "exposure"), ), slider( "Contrast", { min: 0.5, max: 2, step: 0.05, format: twoPlaces }, bind(sky.imageProcessing, "contrast"), ), ], }, { label: "Frame", collapsed: true, controls: [ readout("Showing", (): string => (isShowingB ? curveB : curveA)), readout("Draw calls", (): string => String(app.renderer.drawCalls)), ], }, ], }); },});/** * The numbers `tone-mapping` is composed with, and the ramp of emissive spheres the curves are read * off. * * @remarks * Split out for the reason `pbr-model/shot.ts` is: what a reader wants from `main.ts` is the * `imageProcessing` record and the four curves, not six material declarations. Every number here is * a composition choice. */import { createMaterialAsset, MeshAsset, MeshRenderer, pbrMaterialDefinition } from "ignifx";import type { App, ColorLike, ToneMappingCurve } from "ignifx";/** * The subject: the Khronos Corset, authored at 4 cm, drawn at sixteen times that, left of the ramp. * Its origin is the foot of its stand, so a `height` of zero stands it on the floor; its middle is * then 0.46 m up, which is where {@link FOCUS} looks. */export const SUBJECT = { address: "models/corset.glb", scale: 16, height: 0, x: -0.45 } as const;/** What the camera looks at, between the corset and the ramp, and what the light rig is aimed at. */export const FOCUS = { x: 0.3, y: 0.55, z: 0.4 } as const;/** * The opening shot: steep enough that the floor, not its horizon, fills the frame behind the * corset and the ramp. */export const SHOT = { fov: 34, yaw: 8, pitch: 24, distance: 4 } as const;/** The exposure and contrast the example opens on: enough that the brightest steps pass white. */export const GRADING = { exposure: 1.5, contrast: 1.05 } as const;/** The key light, bright enough to put a clipping highlight on the corset's metal. */export const KEY_INTENSITY = 6;/** * The tone-mapping curves, by the label the panel shows; the values are `TONE_MAPPING_NAMES`. * * @remarks * `none` clips: anything above one becomes white and every colour in it goes with it. `standard` is * Babylon's own curve. `aces` is what most engines call filmic — it rolls a bright highlight off * towards white instead of cutting it, and desaturates as it goes. `neutral` is the Khronos PBR * neutral curve, which keeps hue and saturation much closer to the input and is what a product shot * usually wants. */export const CURVES: Readonly<Record<string, ToneMappingCurve>> = { None: "none", Standard: "standard", ACES: "aces", Neutral: "neutral",};/** The curve the example opens on, and the one every capture shows. */export const START_CURVE = "ACES";/** The curve the comparison toggle flips to. */export const COMPARE_CURVE = "None";/** How many spheres the emissive ramp has. */const RAMP_COUNT = 6;/** The ramp: sphere size, spacing, height, where its brightest step stands and how far back. */const RAMP = { diameter: 0.24, spacing: 0.3, height: 0.5, x: -0.05, z: 0.9 } as const;/** How many segments a ramp sphere is built from. */const RAMP_SEGMENTS = 24;/** The ramp's hue: a warm amber, so a clipped step reads as white and an unclipped one as amber. */const RAMP_HUE: ColorLike = { r: 1, g: 0.66, b: 0.3, a: 1 };/** The lowest emissive level in the ramp, in sRGB. */const RAMP_FLOOR = 0.3;/** What a ramp sphere's own surface is: near-black, so only its emissive term shows. */const RAMP_BODY: ColorLike = { r: 0.02, g: 0.02, b: 0.02, a: 1 };/** * Builds the ramp of emissive spheres a tone-mapping curve is read off. * * @remarks * Six spheres whose `emissive` climbs from {@link RAMP_FLOOR} to full, brightest on the left, * standing beside the subject and drawn on a near-black surface so nothing but the emissive term * shows. That is the whole instrument: the exposure multiplies every one of them, so raising it * walks the ramp past white from the left, and what each curve does with the steps that went past * is the difference between the curves. Under `none` they turn flat white one after another and the * amber goes with them; under ACES and Neutral they keep climbing and keep some of their hue. * * A material's `emissive` is sRGB and clamped into `0…1`, so the brightest step here is exactly * one — anything past that comes from the exposure, which is the control the panel gives you. * * @param app - The app the entities and assets belong to. * * @example * ```ts * createEmissiveRamp(app); * ``` */export function createEmissiveRamp(app: App): void { const mesh = MeshAsset.sphere(app, { diameter: RAMP.diameter, segments: RAMP_SEGMENTS }); for (let index = 0; index < RAMP_COUNT; index += 1) { const level = RAMP_FLOOR + ((1 - RAMP_FLOOR) * index) / (RAMP_COUNT - 1); const material = createMaterialAsset( app, pbrMaterialDefinition({ name: `tone-mapping/step-${String(index)}`, baseColor: RAMP_BODY, metallic: 0, roughness: 0.9, emissive: { r: RAMP_HUE.r * level, g: RAMP_HUE.g * level, b: RAMP_HUE.b * level, a: 1 }, environmentIntensity: 0, }), [], ); const x = RAMP.x + (RAMP_COUNT - 1 - index) * RAMP.spacing; const entity = app.world.createEntity(`Step ${String(index)}`, { position: { x, y: RAMP.height, z: RAMP.z } }); entity.addComponent(MeshRenderer, { mesh, materials: [material], castShadows: false, receiveShadows: false }); }}